
Yii2中的OAuth扩展 QQ第三方登录
浏览量:468
刚开始学习yii,还没从tp框架的思想中出来,弄点东西比较慢,好歹功夫不负有心人,我还是成功做到了
首先你要安装yii2自带的扩展OAuth安装
都在写程序了,想必你已经安装过composer应用了,这个还是需要装的,这样装扩展比较简单,只需要一行代码,你可以用cmd指定到你的目录,也可以安装一个git(在你项目里Git Base Here)即可搞定:
composer require --prefer-dist yiisoft/yii-authclient
等待安装完成即可
2.然后我们填加QQ登陆组件,我放在自己的目录下面,yiitest\common\components\QqOAuth.php
<?php
/**
 * @link http://www.yiiframework.com/
 * @copyright Copyright (c) 2008 Yii Software LLC
 * @license http://www.yiiframework.com/license/
 */

namespace common\components;

use yii\authclient\OAuth2;
use yii\base\Exception;
use yii\helpers\Json;
/**
 * Facebook allows authentication via Facebook OAuth.
 *
 * In order to use Facebook OAuth you must register your application at <https://developers.facebook.com/apps>.
 *
 * Example application configuration:
 *
 * ~~~
 * 'components' => [
 *     'authClientCollection' => [
 *         'class' => 'yii\authclient\Collection',
 *         'clients' => [
 *             'facebook' => [
 *                 'class' => 'yii\authclient\clients\Facebook',
 *                 'clientId' => 'facebook_client_id',
 *                 'clientSecret' => 'facebook_client_secret',
 *             ],
 *         ],
 *     ]
 *     ...
 * ]
 * ~~~
 *
 * @see https://developers.facebook.com/apps
 * @see http://developers.facebook.com/docs/reference/api
 *
 * @author Paul Klimov <klimov.paul@gmail.com>
 * @since 2.0
 */
class QqOAuth extends OAuth2
{
    /**
     * @inheritdoc
     */
    public $authUrl = 'https://graph.qq.com/oauth2.0/authorize';
    /**
     * @inheritdoc
     */
    public $tokenUrl = 'https://graph.qq.com/oauth2.0/token';
    /**
     * @inheritdoc
     */
    public $apiBaseUrl = 'https://graph.qq.com';
    /**
     * @inheritdoc
     */
    public $scope = 'get_user_info';

    /**
     * @var int 数据库存储id
     */
    public $third_id = 0;


    /**
     * @inheritdoc
     */
    protected function initUserAttributes()
    {
        $openid = $this->api('oauth2.0/me', 'GET');
        $qquser = $this->api("user/get_user_info", 'GET', ['oauth_consumer_key'=>$openid['client_id'], 'openid'=>$openid['openid']]);
        $qquser['openid'] = $openid['openid'];
        return $qquser;
    }

    /**
     * @inheritdoc
     */
    protected function defaultName()
    {
        return 'facebook';
    }

    /**
     * @inheritdoc
     */
    protected function defaultTitle()
    {
        return 'Facebook';
    }

    /**
     * @inheritdoc
     */
    protected function defaultViewOptions()
    {
        return [
            'popupWidth' => 860,
            'popupHeight' => 480,
        ];
    }

   /**
     * 兼容Qzone,重写的方法
     * @param string $rawResponse
     * @param string $contentType
     * @return array
     * @throws Exception
     */
    protected function processResponse($rawResponse, $contentType = self::CONTENT_TYPE_AUTO)
    {
        if (empty($rawResponse)) {
            return [];
        }
        switch ($contentType) {
            case self::CONTENT_TYPE_AUTO: {
                $contentType = $this->determineContentTypeByRaw($rawResponse);
                if ($contentType == self::CONTENT_TYPE_AUTO) {
                    //以下代码是特别针对QQ互联登录的,也是与原方法不一样的地方
                    if(strpos($rawResponse, "callback") !== false){
                        $lpos = strpos($rawResponse, "(");
                        $rpos = strrpos($rawResponse, ")");
                        $rawResponse = substr($rawResponse, $lpos + 1, $rpos - $lpos -1);
                        return Json::decode($rawResponse, true);
                    }
                    //代码添加结束
                    throw new Exception('Unable to determine response content type automatically.');
                }
                $response = $this->processResponse($rawResponse, $contentType);
                break;
            }
            case self::CONTENT_TYPE_JSON: {
                $response = Json::decode($rawResponse, true);
                break;
            }
            case self::CONTENT_TYPE_URLENCODED: {
                $response = [];
                parse_str($rawResponse, $response);
                break;
            }
            case self::CONTENT_TYPE_XML: {
                $response = $this->convertXmlToArray($rawResponse);
                break;
            }
            default: {
                throw new Exception('Unknown response type "' . $contentType . '".');
            }
        }
        return $response;
    }
}
3.更改config/main.php 文件,注意一定要在components中增加,我之前就加错,导致各种报错
    'components' => [
        'authClientCollection' => [
            'class' => 'yii\authclient\Collection',
            'clients' => [
                'qq' => [
                    'class'=>'common\components\QqOAuth',
                    'clientId'=>'你qq互联申请的clientid',
                    'clientSecret'=>'你qq互联申请的secret'
                ],
            ],
        ],
      ];
4.接下来就按照官网的样子去修改你的控制器就行了例如:SiteController.php
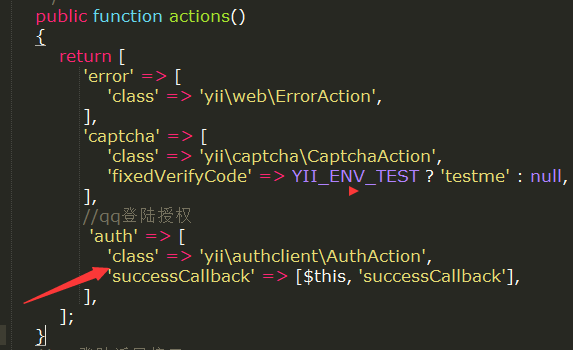
给qq授权:
 //qq登陆授权
             'auth' => [
                'class' => 'yii\authclient\AuthAction',
                'successCallback' => [$this, 'successCallback'],
            ],
增加返回函数:
    //QQ登陆返回接口
     public function successCallback($client)
    {
        echo '<pre>';
        $attributes = $client->getUserAttributes();
         var_dump($attributes,$client->third_id);//获取用户的信息
        die;
        // user login or signup comes here
    }
5.最后一步,在html页面中显示QQ
  <?= yii\authclient\widgets\AuthChoice::widget([
     'baseAuthUrl' => ['site/auth']
   ]) ?>
恭喜你成功了,先在你去访问你的网站试试自己的成果吧
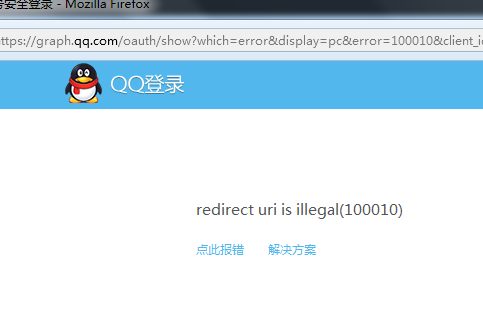
如果你显示出来这个页面,不要担心,程序没有错是你的配置出现了一点小问题,你要去qq互联里设置你的回调函数,
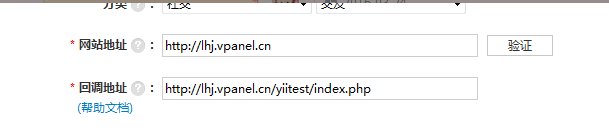
你访问的地址,要和你回调地址是一样的,这样才能保证你100%正确,并能成功获取你所需要的信息,成功永远属于那早做准备的人,希望你也能和我一样,敢于去面对程序中出现的错误,这样我们才会成功,不是吗?
北漂本来就很辛苦,不学点东西,怎么对得起自己受的苦哪?
加油吧,小伙伴们,我相信我们都会成功了。
神回复
发表评论:
◎欢迎参与讨论,请在这里发表您的看法、交流您的观点。